Some days, incoming emails just won’t slow down. And if you’re trying to meet a deadline or focus on a customer issue, scanning each one for critical issues can be a part-time job that delays everything else. Even for people who continuously use the four “D”s of email handling (Delete it, Do it, Delegate it, Defer it), spending the time it takes to identify which “D” you should apply can take half your day. Luckily, Microsoft is always improving their management tools, including totally customizable automation that any end user can create.
Since everyone works a little differently, these tips cover a variety of introductory yet unused ways to organize and react to communications. Try all or some, but keep in mind that you should only implement tactics that work for your work style. For instance, if you’re a visual-oriented person, using color categories might make the most sense as an organizational foundation. For people who love to work through to-do lists, setting follow ups and reminders can be an easier way to get through your day. Pick one or two that make sense for how you work and start there.
Take a look in another of our blog articles around Outlook Tips & Tricks for additional functionality that can help you work smarter, not harder.
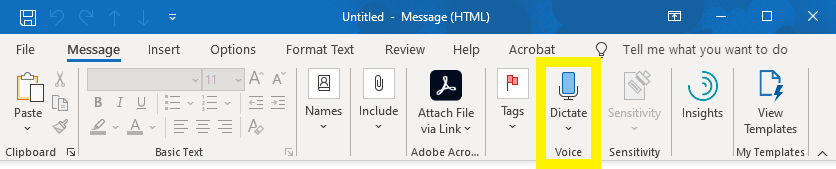
Speed up writing with Dictation
If you use voice texting on your phone, this will be a no brainer. Particularly for email conversations that quickly bat back and forth, Dictation is a one-click solution that allows you to speak the text you want written in your email. You can always go back in and edit before sending.
In Outlook, create a new email and put the cursor in the body of the email. In the ribbon, click on the ‘Dictate’ microphone in the Voice area and start talking.
Take the Shortcuts
We’re a huge fan of keyboard shortcuts, and Outlook has some of its very own. Here is a quick list of the most commonly used ones.
| When you want to | Press |
| Close a window or a menu | Esc |
| Go to the Home tab | Alt+H |
| Create a new message | Ctrl+Shift+M |
| Send a message | Alt+S |
| Insert a file | Alt+N, A, F |
| New task | Ctrl+Shift+K |
| Delete an item (when a message, task, or meeting is selected) | Delete |
| Search for an item | Ctrl+E or F3 |
| Reply to a message | Alt+H, R, P |
| Forward a message | Alt+H, F, W |
| Select the Reply All option | Alt+H, R, A |
| Copy an item | Ctrl+C or Ctrl+Insert
Note: Ctrl+Insert is not available in the Reading pane. |
| Go to the Send/Receive tab | Alt+J, S |
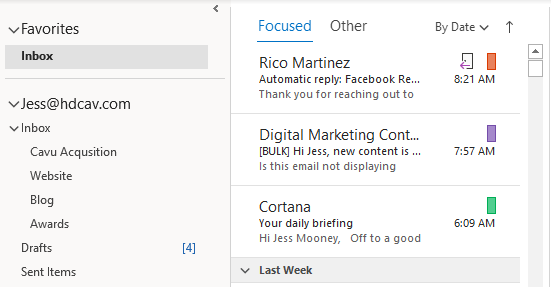
Stay Focused with a separated inbox
Your Inbox has an option to have two areas of emails that are separated by importance: Focused and Other. To start, Outlook has a general idea about which emails are important to you and it sorts them into each area accordingly. For instance, it will automatically put any email from someone in your organization into Focused. For others, it makes a guess, but you can easily teach Outlook how to sort your incoming email by right-clicking on the email and selecting ‘Always move to Other’ or ‘Always move to Focused’ as the case may be.
To enable and disable the Focused inbox, go to the View tab in your ribbon and click on ‘Show Focused Inbox.’

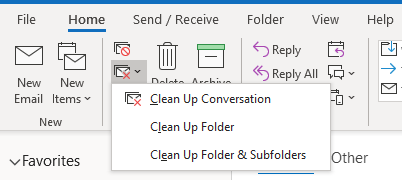
Clean Up your inbox in one click
Especially for those who prefer to view emails individually instead of in conversations, this works like magic. It identifies and removes everything but the most recent message in an email thread. So, when you get back from two weeks of vacation, that 136 of unread emails quickly reduces down to 86. It takes a little of the stress off without actually removing any messages.
To use Clean Up, click on the folder (this can be your Inbox or a folder that you created) and click on the ‘Clean Up’ button in the Delete tab in your ribbon. Select Clean Up Folder or Clean up Folder & Subfolders as you see fit.
A popup will appear that alerts you that all redundant messages will go to the Deleted Items folder. This can be a little worrisome as you get used to the tool, but don’t worry. This is a sophisticated tool that easily identifies previous emails in a thread, so there’s no concern that important information will be deleted. You just open the email that is left in your folder and scroll down to past messages.
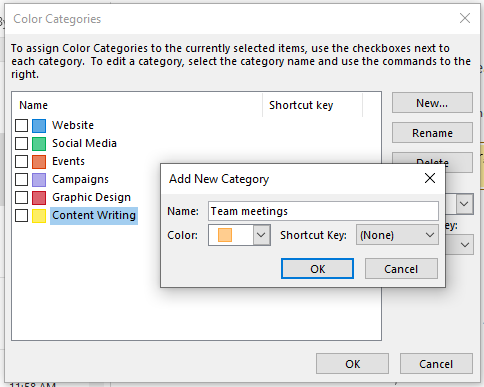
Categorize emails to quickly see what they’re about
Categories can be helpful when you want to quickly identify its type or what its regarding without actually reading it. Sound tricky? It’s easy, but like everything else, it’s all in the set up. The best way to start is to jot down the major projects, accounts, and or issues that the majority of your communications are about, then set the categories accordingly. So for a marketing team, the categories may breakdown like:
Website
Social Media
Events
Campaigns
Graphic Design
Content Writing
Team Meetings
To create and manage your Categories in Outlook, go to the Home tab, then ‘Categorize’ in the Tags area. In the drop down, click on ‘All Categories.’ In the new window, rename the existing generic categories by clicking on it to highlight it, then clicking the ‘Rename’ button on the right. You can also create new categories by clicking ‘New,’ naming it, then attributing a color and a shortcut key (optional). You can also delete categories by highlighting it clicking the ‘Delete’ button.
The real power comes when you set up Rules that attribute categories to new emails that are sent to you. That way, your emails are automatically categorized without you doing anything and you’ll be able to see what they regard simply by looking at the color that appears on it in the email preview bar.
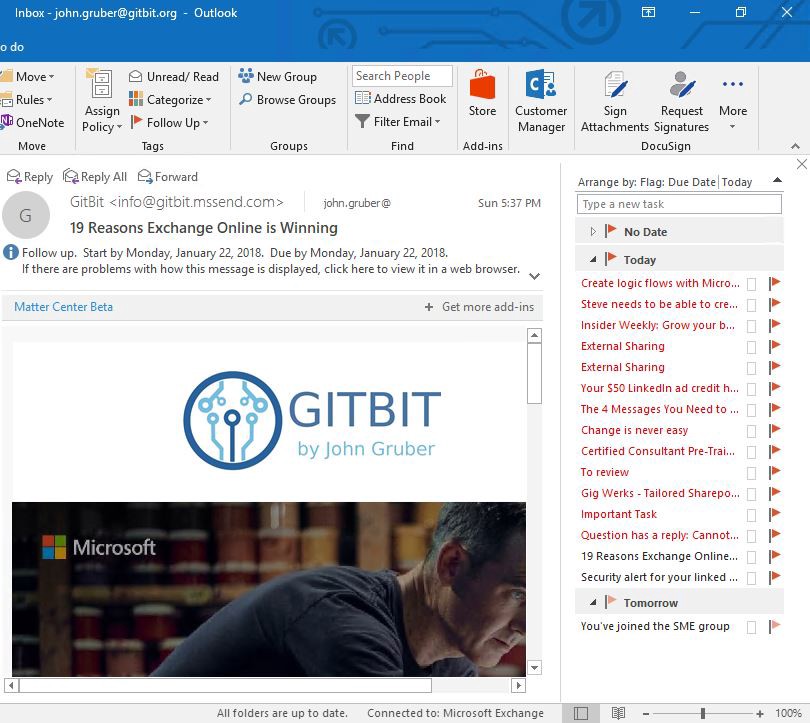
Remember to Follow Up
You can create a chronological to-do list that’s always visible right inside Outlook. And even better, it can be created directly from the emails that need action. The to-do list is generated by the follow ups and task that you create while working through your emails.
So, to get a sidebar like this on the right:
Create Follow Ups
When an email arrives and you need to follow up on it, you have a few options:
QUICKEST – Click on the flag icon in the email preview bar to turn it red. This will automatically set the due date to today. Just hover over the email with your cursor to show the follow up (flag) and delete (trash can) icons.
SPECIFIC – To set the due date and set reminders, right click on the email in the preview bar and hover over ‘Follow Up.’ Click on the day you want the follow up due or set a custom date. You can also create a reminder for it by clicking on ‘Create Reminder’ and setting a date and time.
Create Tasks
Creating follow ups is great, but it doesn’t allow you add notes or instructions. Creating a Task gives you more functionality and saves time when you get back around to working on it because it limits your need to cross reference associated emails and notes.
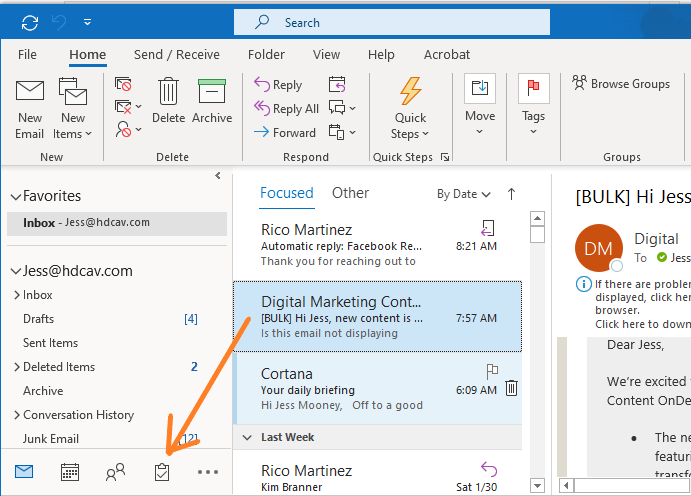
To create a new Task from an email, drag the email from the preview bar to the Tasks icon in the lower left tray.
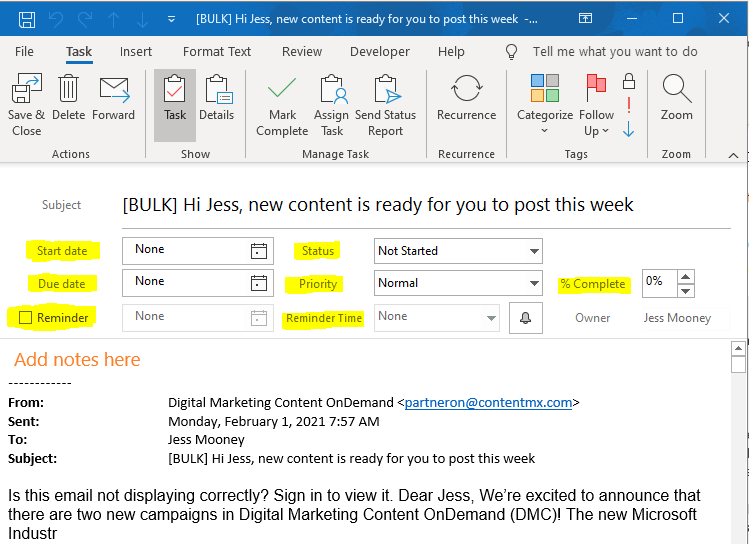
In the Task window that automatically opens, you’ll see the email’s Subject appear as the Task Subject and the body of the email populate the body of the Task. Add your notes above the dashed line and set the Start Date, Status, Due Date, Priority, and Reminder details in the settings. For larger Tasks, you can work incrementally, by setting % Complete. When you’re done, click ‘Save & Close.’
On your way to better email management and less clutter
There are a ton of tips here, but there are always more. Take a look at our HDCav Training Library for more documents and videos on how to use the most popular Microsoft 365 applications, including Outlook training. As always, we’re here when you need us, so if you’re ready to find out more about bringing your users not only the latest productivity tools, but also unparalleled support, contact us. We’re ready to chat you through what it takes to be IT worry free!