Workers who have used Outlook for years are typically familiar with These are some of our favorite tricky tips, but a word of warning: creating too many folders and automations (like those that rules take care of) can eventually create more issues than solve them. Be careful and deliberate about anything you create in Outlook and remember: simple is sophisticated!
TIP: If you’re a fan of building little tools that automate what you do every day, it’s wise to keep a log of your rules. Like a OneNote page or a Word document. Track not only the name and date you create them, but also the reason. For instance, explain the pain you’re solving for (as well as the expected outcome) when you create a new rule. And explain the reason for a new Contact Group, like “Client Onboarding Development Approvals.”
For a look at our simpler Outlook tips, see our Outlook Tips for Better Email Management article. And remember you can always find video training and documentation in our HDCav Training Library.
Organize what to do using Folders
As any document management expert will tell you, separating files out into an organizational structure is only the first step. Putting a process in place on how you use those folders (kind of like a workflow) is the real key to working more efficiently. So, we have some tips for you.
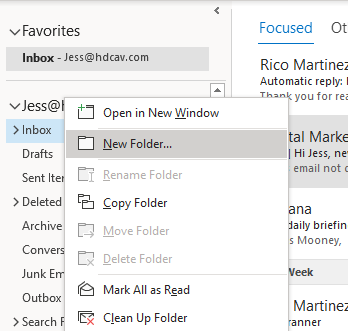
First, you need to create some folders, by going to the left-most bar that contains all of your email accounts and folders. Right-click on the Inbox of the email account that needs a new folder and select ‘New Folder.’ Name it and then click away to save it.
Now to really get folders working for you, you can create folders not only based on the type, project, or customer account. You can create sub-folders that separate them out by how important they are. A good way to handle the filing system is to create definitions for yourself, like:
Inbox – these are emails that are either very easy to handle quickly or are super urgent.
To Do – these are non-urgent emails that take more a few minutes to respond to. You can follow up on these items later, but moving them immediately keeps distractions in your inbox low.
Follow Up – these are emails that are on hold or pending another activity. Like waiting on a response from a colleague or for things you’ve delegated.
Someday – these don’t require a response and have little to no action. They usually consist of FYI, reference, and educational messages.
So for instance, your folder system may look something like:
- Miller & Co Paper Product
- To Do
- Follow Up
- Someday
- HR
- To Do
- Follow Up
- Someday
- Office Events
- To Do
- Follow Up
- Someday
You can also use Rules (see below) to automatically sort incoming emails to their appropriate folder, but you’ll need to be diligent about checking and sorting each one into their subfolders.
Organize emails that contain reference notes, FYIs, and instructions with OneNote
OneNote is a great tool for organizing the variety of information we get every day. Did you know that the out-of-the-box OneNote integration in Outlook can send email content to OneNote notebooks and tabs with a few clicks?
Click on the email that you want to send to OneNote. In the ribbon, click the ‘Send to OneNote’ button in the OneNote tab. In the new OneNote window that appears on the right, select the notebook and tab that you want to send it to. Then click ‘Save.’ That’s it!
Keep team members informed with Contact Groups
This saves time in both remembering who should be included on email and typing them out. Particularly great for a company that has many changing and new projects comprised of different team members. This way, when you create a new email (or forward or reply to one), every member of the correct group is notified.
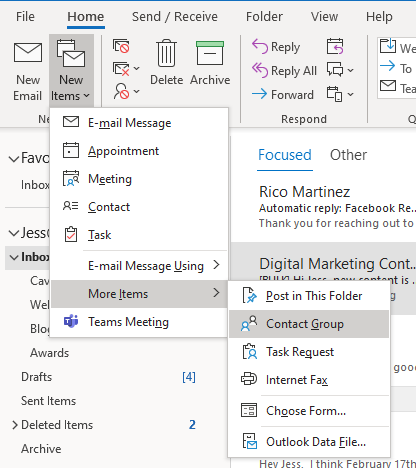
To create a new Contact Group, go to ‘New Items’ in the New area of the Home tab in your ribbon. Then select More Items > Contact Group.
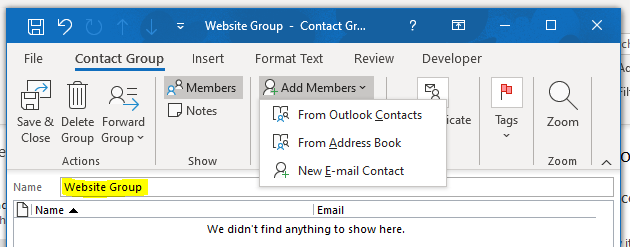
In the new window, name your group. Then click on ‘Add Members’ to select the people you want in the group from the proper source. When you finish building the Group, click ‘Save & Close.’
To manage the group and its members, go to your Groups folder in the leftmost bar and click on the Contact Group you want to change, then click on ‘Group Settings’ from the ribbon. In the window remove or edit the Group and save.
To send an email to that Contact Group, create a new email and in the ‘To’ field, begin typing the Contact Group name. It will automatically appear as a suggested recipient. Or you can click on the Group in the Groups folder in your leftmost bar and then click on the ‘New Email’ button in the ribbon.
Use Rules to automatically sort emails and handle irrelevant emails
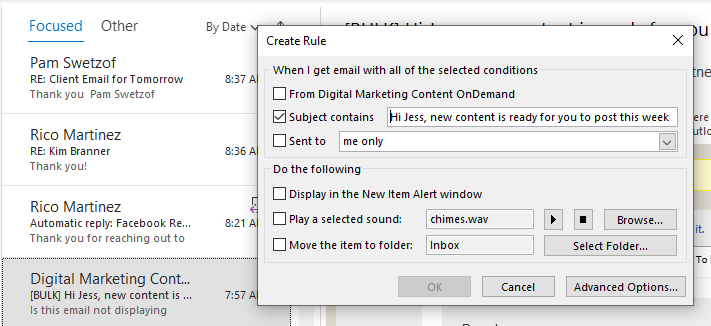
This is a favorite for many Outlook users because you control the automations that do the menial work for you. Outlook can automatically move emails from certain senders to the folders you create or categorize them for quicker identification. It can also send certain emails to your Clutter folder or delete them. There are many other actions, too, like playing certain sounds when a specific email comes in or flagging it for follow up. You can access all of the options by going to ‘Advanced Options’ when you:
Create a new Rule from an email by clicking on the email in your email preview bar and right-click it, then select Rule > Create Rule. In the Create Rule wizard, select which of the emails’ properties that you want the rule to run against: the from email address, words the subject contains, or who the email is sent to. Then select what you want the Rule to do. Click on Advanced Options for many more identifying conditions and resulting actions.
Create Email Templates and Quick Parts for default responses to common messages
These are super time savers for anyone who finds themselves typing out the same or similar messages more than a few times. You can templatize an entire email, only a section or a sentence, or just a word or phrase.
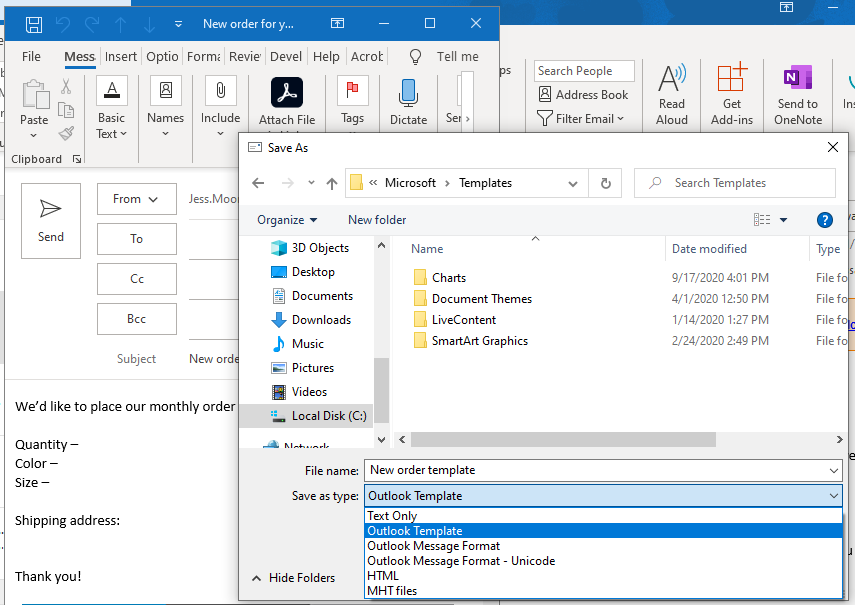
Create a new Email Template
Start a new email and create the Subject and body content for the template. When you have it filled out the way you want, click File in the upper left corner, then click ‘Save As.’ Select ‘Outlook Template’ in the Save as type list. Name your template and select the location you want to save it to, then click Save.
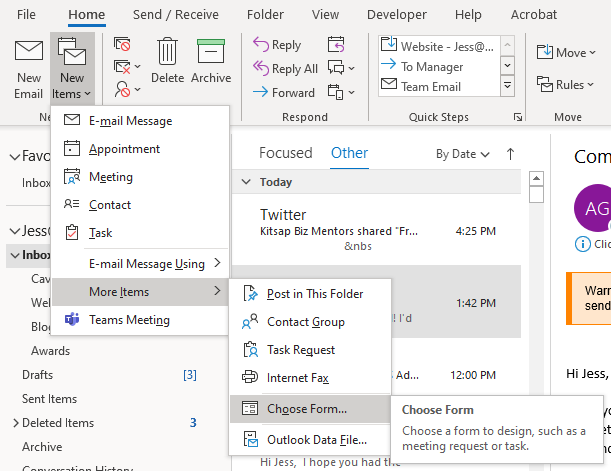
To create a new email using your Email Template, click on ‘New Items’ in the New area of the Home tab in the Outlook ribbon. Select More Items > Choose Form.
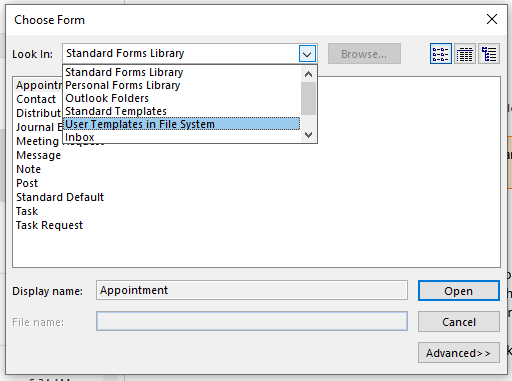
In the Choose Form window, select ‘User Template in File System’ in the Look In drop down, then click ‘Browse.’ Then search the files to select the correct folder. When the folder is clicked on and highlighted, click ‘OK’ and all applicable Outlook templates will appear. Select the correct template and click ‘Open.’
A new email will appear with the template fully populated. Enter the recipient and customize the text if necessary, then click ‘Send.’
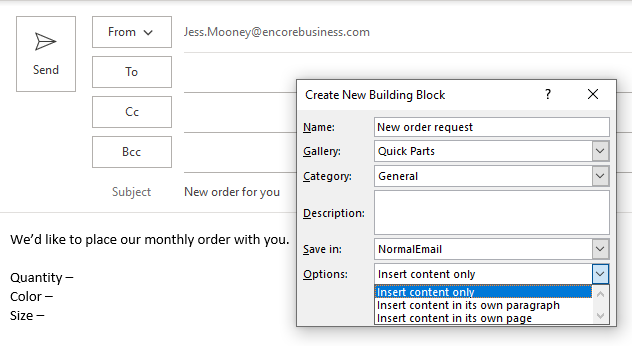
Create a new Quick Part to insert a section or sentence
Start a new email and type the phrase, sentence, paragraph, or section of an email that you will use repeatedly. Highlight it and in the ribbon, select the Insert tab, then ‘Quick Parts’ from the Text area. Select ‘Save Selection to Quick Part Gallery.’

In the Quick Part window, name it and add a Description if you like. Under ‘Options,’ you can set it to appear in different layouts. Click ‘Save.’
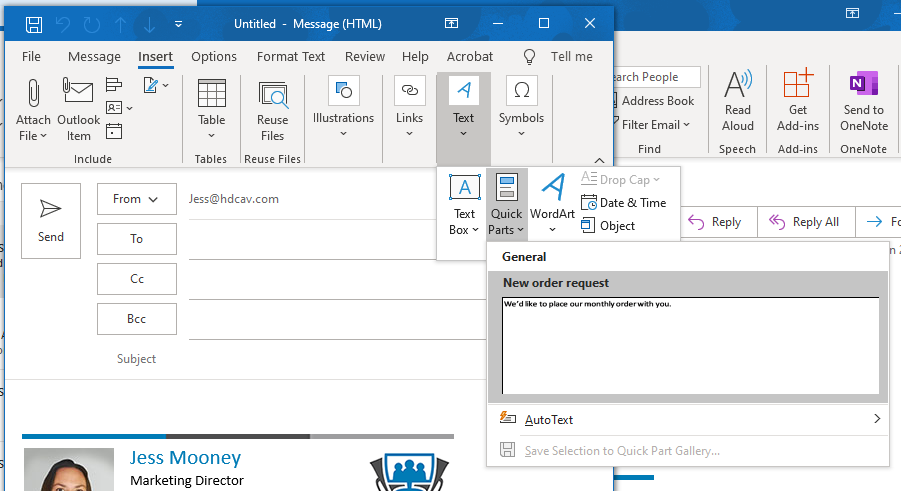
To use your Quick Parts in an email, put your cursor in the area of the body that you want the content to appear and go to the Insert tab, then ‘Quick Parts’ from the Text area. Select the Quick Part that you want to insert, and it will appear in the email.
Make AutoText write complicated or long words for you
For long names that must be written out in completion and are writing over and over again, use AutoText to make Outlook suggest the name as you write it so you can click on it and auto-fill it in the body. Create a new AutoText by typing out the name in the body of an email, then highlighting it. Go to the Insert tab in the ribbon, and click on ‘Quick Parts’ from the Text area. Select ‘Save Selection to Quick Part Gallery.’
In the Quick Part window, name it and add a Description if you like. Under ‘Gallery’ select AutoText. Click ‘OK.’

To use AutoText, simply start typing the saved text in the body of an email and the AutoText suggestion will appear. Click the ‘Enter’ key to add it to the email.
Use Quick Steps to take instant action on new email
This is a more advanced automation set up that allows Outlook to perform a serious of tasks automatically based on criteria you set. For example, it can set the importance and a category on an email, automatically forward it, then create a task with a reminder for you.
To create a new Quick Step automation, click on an email that you wish to create a new Quick Step for and then on ‘Create New’ in the Quick Step area of the Home tab in the ribbon.

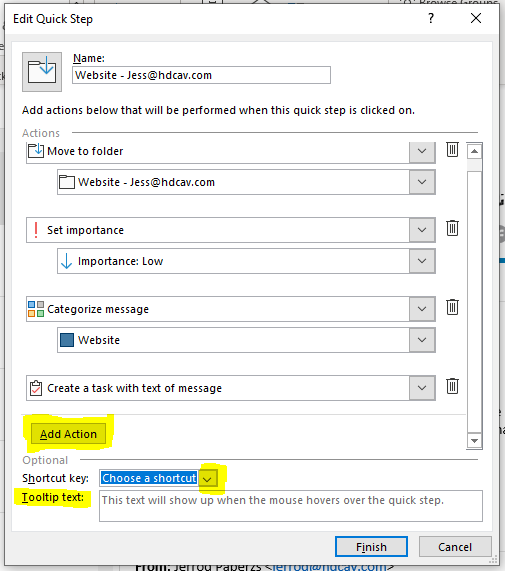
In the Edit Quick Step window, name it, then start building your actions. Use the drop down to select Actions and add more by clicking the ‘Add Action’ button. You can remove any of them by clicking the trash can icon to the right of the Action.
It’s can be helpful to use the two optional settings at the bottom to assign a shortcut key (this will apply the Quick Step to any email you’re on simply by clicking that key) and the Tooltip (this will appear to remind which Actions are included when you hover over the Quick Step).
On your way to better email management and less clutter
Take a look at our HDCav Training Library for more documents and videos on how to use the most popular Microsoft 365 applications, including Outlook training. As always, we’re here when you need us, so if you’re ready to find out more about bringing your users not only the latest productivity tools, but also unparalleled support, contact us. We’re ready to chat you through what it takes to be IT worry free!